Monday, February 29, 2016

Energy Independence: The Solar Solution

Editor's Note:  I cranked this post out quickly without my usual proof read.  Please forgive any typos, etc.  I have a baby to hold and I will check my grammar later.
In honor of Leap Day, I will tell you about a big leap we took.  We jumped on the solar bandwagon.
I've been looking into this for a long time, but finally pulled the trigger.  Let me back up and start at the beginning.
I've always liked the idea of being "energy independent," or producing as much or more power than we needed, but the most logical way to achieve that was via rooftop solar panels.  Our house is well suited for solar, with an expansive south-facing roof, but we had one big problem:  shade.  For better or worse, our neighbor had a huge tree just to the south of us, making solar a nonstarter.
Early last year they cut that tree down, and I began my solar quest.  I understood the basic concept of solar (photovoltaic panels + inverter = no electricity bill and no pollution), but I wasn't familiar with some of the details (What does solar cost in 2015? How does net energy metering work?). Luckily a friend of ours was a salesman for SolarCity.  He gave me a zero-pressure crash course in rooftop solar, along with a couple quotes.  Here are my two main takeaways:
  1. Solar is much cheaper than I realized, but the return on investment depends very much on your electricity usage.  The more you use, the better the economics (our usage is quite low so the payback period is pretty long; however, the environmental benefits offset that for us).  A purchased system will pay for itself in about 10 years for most people.  If you are comfortable leasing a system, you will save money from day one.  It's pretty cool.
  2. The utilities are buzzkills.  One of my biggest questions was whether it made sense to install a bunch of excess capacity and sell the extra power back to the utility.  In a word, no.  The utilities won't let you connect more capacity than you are expected to use to their grid, and if you do manage to produce more power than you use over the course of a year, they will only pay you about 1/4 of the price they charge for power, or four cents per kWh.

I was off to a good start, but things started getting complicated when we tried to size our system. Our electricity use was very stable, then we bought a plug-in vehicle (with additional future plug-ins a real possibility) and were on the verge of having a baby and a stay-at-home parent.  They usually base your system on your previous year of usage, but that didn't make sense for us.  We could wait a year and see how our usage looked, but there were a couple things making me want install sooner rather than later:
  1. At the time, it was unclear if congress was going to extend the 30% tax credit on home solar that was set to expire at the end of 2016 (they did end up extending it).
  2. The California Public Utilities Commission was considering changing the net metering rules.  If they followed the recommendations of the utilities, residential solar would no longer make economic sense, so I wanted to get grandfathered in under the old rules (they ended up making some changes, but nothing major).
I was convinced we should act fast, so I had to try to predict what our usage would be and then convince the solar companies and my utility, Edison, that my estimations were reasonable.

At first we got quotes from a local company as well as SolarCity.  Each quote had it's advantages, but neither felt right.  I thought the local company was slightly overpriced and the warranty was a little short, but they were pretty flexible and would install what I wanted.  SolarCity was kind of the opposite.  While still on the expensive side, they offered an unbeatable warranty, but they weren't flexible in the slightest and were only willing to install a relatively small system.

Dissatisfied with either option, I stewed for a few months and even thought about doing everything myself.  I think I could do the actual install, but all the permits, paperwork, and buerocracy to actually connect it to the grid did not appeal to me.  I eventually decided to get three more quotes.  I tried to find companies that were a little bigger and more reputable than the local firm (so they could offer and honor longer warranties), but still small enough to be flexible and work with me.
In the end, all the quotes were pretty similar.  They each had little positives and negatives, but I eventually decided to go with LA Solar Group (if you happen to get solar through them, make sure to tell them I sent you, or use this link and give them my info).  The main reasons I chose them were because they were flexible enough to do exactly what I wanted, they seemed like a very reputable company (they have the best online reviews), and I really liked the salesman who visited us.

When I was finally ready to pull the trigger, one big question came up:  Do we need to upgrade our main panel?  At first I was trying to avoid it, but I was eventually swayed by logic.  If we kept our old panel it was going to be marginally acceptable, and if we ever wanted to install a high powered vehicle charger, we would have to upgrade the panel anyway.  However, if we did it now, we could include it in the 30% federal solar rebate.
The solar installers could arrange for the panel upgrade, but I really liked the electrician who wired up our hot tub, so I had him come do the panel.  You can see our old panel (with the face plate removed) above.  Our swanky new 200 amp panel is below.

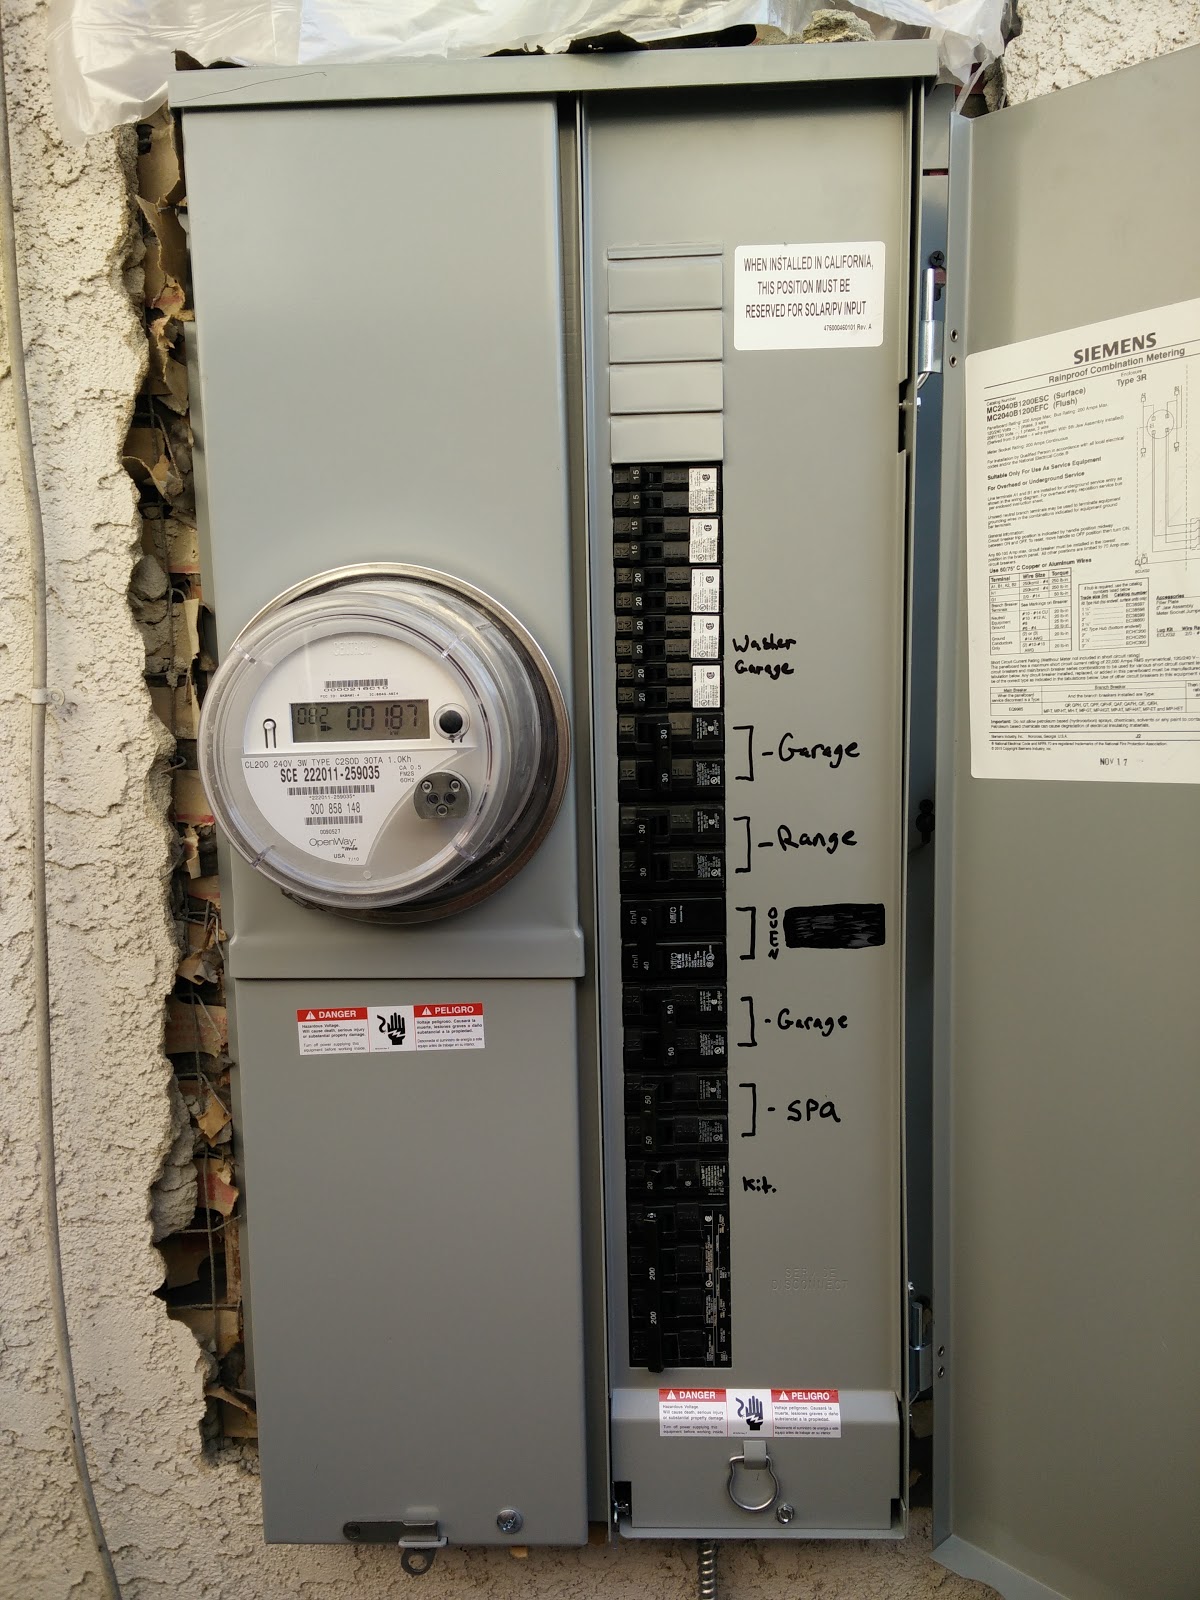
Some stucco work is still needed.  I am waiting until everything is totally done before repairing that, just in case they need to go back in.  The new panel had to meet all the crazy new codes, including this ground rod that goes eight feet into the earth.  They also had to run grounding wires all the way across the house onto the gas and water mains.

I was clever and had the electrician do a little extra work.  Since our garage only has outlets on the back wall, on questionable circuits, I had one a dedicated 110v outlet installed along with two 220v lines.  One of those is a beefy 50 amp circuit which could cram electrons down the throat of any electric car and the other is a 30 amp which could power a heavy duty welder or air compressor some day.
The serious 220v wiring is hiding in the blank box.
Once the panel was done, we were ready for solar, which was installed shockingly quickly.  It would have been done in well under a day except the panels themselves didn't arrive in time, so the first day they just did the racking, wiring and inverter.
They came back the next day and installed the panels in less than an hour.


You may notice the extra railing in the photo above.  I asked them to install that so I could easily add one more panel in the future.  This is a little complicated, but I promise it makes sense--these net metering agreements with the utility allow you to add 10% capacity without a whole new agreement.  With that in mind, I specifically asked for a system with 10 panels.  This would make it easy to add one more panel and get exactly 10% more capacity.  The original plan was to use eight 325 W panels, but I had them switch to 10 275 W panels.  I also asked for a slightly higher capacity inverter which could handle more panels down the road.  That cost practically nothing, so I recommend considering that if you get solar.

After everything was installed we had to wait for city inspections, which took a couple weeks, and for Edison to grant us "Permission to Operate," which only took a couple days, even though I was told to expect 4-5 weeks.

The system has now been on for a few days and we are producing more power than we use, which is very exciting financially and environmentally.

Speaking of finances, you might be curious how much all this cost.  We decided to purchase the system to guarantee the maximum return on our investment and to avoid any hassle if we decide to sell our house in the next 25 years.  The total price was around $15,000 for our 2.75 kW system (of that, about $3,000 was for the panel upgrade and the wiring to the garage, which might not be necessary for others).  We should get 30% back on our taxes, so the actual cost will be $10,500 and our expected payback period is about 13 years.


Saturday, February 27, 2016

Angle of the Faucet Dangle

We have a big sink, but our faucet is not well suited to it.  The faucet has a relatively short reach and and it is offset to the left due to the design.  It is usable in the left basin, but it barely reaches the right.  Rather than spend money on a new faucet, I decided to try and optimize our current one.
My idea was to rotate it counterclockwise 45 degrees, putting the spigot about an inch further forward and to the right.
On first inspection, I wasn't able to figure out how to loosen the faucet, then I RTFM online and it was quite easy.

With the whole faucet rotated, we thought we were home free, but we ran into one small problem.  The rotation of just the spigot was limited and couldn't cover the back of the left side now.
After consulting the manual again, it turns out the part limiting the rotation can be removed.

To remove that part, we had to take off the spigot, which was held on by a clip that was invisible due to calcification.  With the help of some CLR, we forced the clip out and yanked the spigot out.

My brother helped with this project too, and we both struggled to get the target piece out.  After messing with it for a while, I soaked it in CLR in case it too was calcified in place.

Eventually, we pried it out with the help of a bent nail.

After getting everything back together, we have a rotated faucet with a freely rotating spigot.  The change is subtle, but the functionality is definitely improved.

Wednesday, February 24, 2016

Sliding Glass Salvation

Our sliding glass doors weren't very good at the whole sliding thing.  It took a lot of effort to open or close them and worst of all, the door off the dining room made a horrible screeching noise whenever it moved.  Something clearly needed to be done.  Luckily my dad recognized this and took action instead of ignoring the problem like me.
He bought us replacement rollers, but it was up to me to install them.  Below you can see the old ones had seen better days.  You might also notice the new rollers are different from the old ones.  I noticed that too, but we went ahead and tried them and they worked well enough.
Old Rollers
New Roller
I was happy to have my brother's help with this project.  It would have been very cumbersome to do alone.  The new rollers weren't an exact fit, but we crammed them in and hoped for the best.

We also took the time to clean and lube the tracks.  Once that was done, we put the doors back in place and were mildly surprised when they worked beautifully.  It is a relatively simple thing, but it is SO NICE to have doors that slide smoothly.  We should have done this ages ago.
Thanks for the inspiration and the parts, Dad.

One interesting discovery was the door on our bedroom was installed incorrectly so anyone could easily pick up and move the non-sliding panel and get into the house.  A couple stainless steel screws fixed that problem.  A nice side effect is the whole assembly is noticeably better sealed now, letting in less cold air and noise.  This was a very good project.


Tuesday, February 23, 2016

Hot Tub Heroics

Our worst fears came true--the hot tub sprung a leak.  There was no clearly visible source of the leak, so I thought we were in for some major exploratory surgery.  Luckily, I stumbled upon a commenter on a website who recommended trying a product called Fix-A-Leak before tearing apart the spa.  He said it doesn't always work, but it's worth a shot.
We went ahead and ordered a big bottle and followed the directions as best we could (the directions on the bottle seem to contradict the spa-specific recommendations on their website).  After a fairly conservative first round we still had a leak, but it seemed to be slowing.  We poured in a second helping and a few days the later the dripping had stopped.  YESSSSSSSSSSSSSS!

The next step was to drain the spa and let the product cure.  When he spa was finally empty I wiped it down to get rid of any residue and let it sit.

Four days later we refilled the spa and it seems to be leak free.  The patch is supposed to be permanent and strong, but I'm still too scared to turn the jets on for fear of it blowing out the repair.  I will keep you updated if anything happens.


Sunday, February 21, 2016

Dirty Diaper Destroyer

Don't believe Chrissy when she says I never mop.
As you just learned, we are cloth diapering Hope.  A very important piece of the cloth diaper puzzle is a diaper sprayer.  The sprayer is used to rinse the solids off the diaper, hopefully sparing our washing machine some grief.
We ordered what turned out to be a super high quality sprayer sold by a company called SmarterFresh.  Check out the meticulous packaging.  Yes, there are two protective caps on each end of the hose!

As you saw above, the first step was a thorough cleaning of the toilet and surrounding area because this install forces you to get pretty intimate with the toilet.
Luckily the install is pretty simple.  A tee with an adjustable valve is inserted between the supply hose and the toilet tank.  This is where the sprayer's hose attaches and where you can adjust the pressure.  At full blast, the stream is strong enough to take down a bull moose.

The actual sprayer lives in a holster that slips over the top edge of the tank.

The completed install looks like this.
There was one small hiccup in the install--the sprayer head leaked.  I emailed SmarterFresh and received a reply 22 minutes later instructing me how to fix it.  That's customer service.

Saturday, February 20, 2016

Dapper Diapers

Baby Cloth Diapers all in One Size Set by Angelicware. Reusable Bamboo Pocket Diaper Cover + 5 Layer Inserts + Wet Bag. Absorbent leak proof aio. Best Diapering Gift Bundle Pack. Keep them Happy & Dry
After learning babies go through about 12 diapers ever day and realizing the absurd amount of waste (and expense) that would create with disposable diapers, Chrissy and I decided to try reusables.
We came into this completely ignorant, but we are figuring it out pretty quickly.  We started by purchasing two sets of Angelicware diapers and some extra inserts.  That equated to eight diaper covers and 20 inserts.
We also bought reusable wipes, starting with 12, but quickly adding 24 more, which might have been a little excessive.  To go with the wipes, we bought some "diaper area wash" which seems to work well despite us diluting it mercilessly.
Finally, we bought a diaper pail and washable liners, making us totally trash-free.

As soon as we got Hope home, we realized we needed something smaller to start with.  We were using disposables for the first couple days while Hope got the really nasty initial poo out of her system, so we had time to quickly order a set of Alva Baby newborn diapers.  This set came with six diaper covers and 12 inserts.  However, the inserts are pretty small, so we usually double them up and they go fast.  We often use the Angelicware inserts in the Alva diapers, even though they are a little too big.
Alva Baby Pocket Newborn for Less Than 12pounds Baby Snaps Cloth Diaper Nappy 6pcs + 12 Inserts 6SVB03

We saved a ton of money by buying little-known brands on Amazon, but the diapers still weren't that cheap, so I undertook a little project to help protect them.  I randomly came across a website preaching the wonders of fleece diaper liners and decided it seemed like a good idea, especially with the Alva's white inserts.
The liners are deceptively simple to make.  You just buy some fleece (of which there is a nearly overwhelming number of different types; I went for "anti-pill fleece") and cut it into rectangles that fit in the diapers.  That's it.  No sewing or anything.  I got a little fancy and rounded the corners on ours.
I went with a charcoal color because it matched the (thoughtfully colored) Angelicware diapers and it seemed likely to hide stains well.

This project is extremely cheap.  I bought one yard of fleece for about $5 and started by making 15 liners.  I still have enough fabric to make three or four times that many.
I didn't realize it until I read it, but fleece allows liquids to pass right through it while continuing to feel pretty much dry to the touch.  This is perfect for diapers.  Liquids go through the fleece to the inserts while the fleece liner catches the solids and keeps baby's bottom feeling dry.

Hope is almost a month old and the cloth diapering is going well.  We probably underestimated how many diapering supplies we needed, but we will continue to monitor it.  Hope's bathroom schedule is still pretty random, so we will see how things go when she finds her rhythm.  As it stands now, we are doing laundry every day, which isn't as bad as it sounds because the loads are really small.

One more thing.  To everyone who was skeptical of cloth diapering and didn't think we would follow through--bite me.  We got this.

Friday, February 12, 2016

Perfect Pantry

It looks innocent enough, but inside our pantry lurked a diabolical fiend--disorganization. It was a struggle to know what we had in there, let alone discovering where it was then extracting it.  We did some previous work with a couple bins, but it wasn't enough.
Before
Instead of bonding with our new baby, I used my time off work to tackle the disorder.  As you can see below, it is much better now.  All it took was a couple bins, a little time, and a bowl for potatoes and onions.  I also had a little help from my Mom.  Thanks Mom.
After

Monday, February 8, 2016

Spa Vac Victory

Our handy-dandy Spa Vac broke.  As you can see below, the flapper on the one-way valve broke off.  This a very critical part and the unit is useless without it.

I procrastinated on ordering a new valve because the part was $2.10 but shipping was $9.46, and I refused to order as a matter of principle.  Luckily, my dad isn't as cheap or stubborn as me and he surprised me with a new valve on a recent visit.
After herniating myself trying to remove the old valve (eventually cutting it off), the new one popped right on and the Spa Vac is back in action.

Saturday, February 6, 2016

Only We Can Prevent Head Injuries

During a recent wind storm, the spark arrestor we installed blew off the top of the chimney.  Luckily we have an appropriate ladder now, so no crazy antics were required to reinstall it.

Friday, February 5, 2016

Trespassing for Tree Trimming - Redux

Before
As you know, I hate our neighbor's tree.  Despite my, and mother nature's, earlier efforts, it continues to drop foot-destroying seed pods all over our patio.  My dad noticed this and brought down his pole saw so I could cut off some higher branches.
After repairing the saw, I made quick work of the offending branches.  I only had to resort to unsafe tactics to reach a couple of them.
After

Wednesday, February 3, 2016

Bright Night Light

Before
We bought a night light for Hope's room so we could sneak in to check on her or turn on a non-blinding floor lamp without tripping over anything.  Unfortunately, the nightlight itself was a little too blinding.

The problem was the light could go straight out the top without any diffusion.

I made a spiffy diffuser out of parchment paper and stuck it in the top of the light.  Since it is an LED, I don't anticipate any heat-related issues.

 The light output is now much more reasonable.
After