Thursday, July 31, 2014

Special Switch

This could probably be included with the fan post, but I think it's cool enough to deserve its own post.
Before
The bedroom fan came with a remote  that actually has some cool features.  Most notably, a timer function, which allows us to go to bed with the fan on and have it turn off automatically after 2, 4, or 8 hours.
The question is, where should we keep the remote?  It comes with a little holster which can be mounted on the wall, but I thought it would look odd mounted in a random place on the wall, and the screws provided looked insufficient, so I had to come up with something else.

Here's the solution I came up with:
Work of a super genius.  Patent pending.
I got a double switch plate and mounted the remote holster to one side then screwed it onto the single switch, creating a spiffy little command center.  I think it creates more continuity than just mounting the remote on the wall next to the switch.  It is a much more elegant solution, and I don't have to put any holes in the wall.

Tuesday, July 29, 2014

Fan Frustration

This was my view for way too much time.
After the success of the ceiling fan in our office, we decided it would be nice to have a fan in the master bedroom.

This is how we prepped for the impending drywall mess.

While in the attic for the previous fan, I had investigated the wiring in the bedroom and determined I could intercept the wiring from the existing light switch to power the new fan.  Unfortunately, that would still involve a lot of time in the attic.  I started by cutting a circle.


I then had to install another receptacle to hold the fan, which was just as miserable as the last one.


Next it was time to do the wiring.  This is where the problems began.  I snipped the hot, switched wire, which used to go to a pair of outlets, and ran that to the box.  I needed to keep the common wire where it was to power other outlets, so I tried to tap into a different common wire.  Bad idea.

This resulted in a very low voltage at the box which couldn't power the fan, so I had to go back into the attic and tap the original common wire.  This is how I learned AC and DC are different.
When doing this, the outlet in the master bath stopped working, but I'll come back to this.
Once I got power to the ceiling receptacle, I mounted the fan, a Harbor Breeze Kingsbury. We liked this fan because it was big (70" diameter) and low profile (15" from ceiling to bottom of light).

It looked good in the room too.

Unfortunately, it shook violently.  I did a little research and found this review on Lowes' website, which could have easily been written by me:  

Love the look of the fan, so after getting what we hoped was a lemon, we returned it and got another. Same thing, the fan hub is out of round and vibrates excessively. Terrible quality. Can not run the fan over the lowest setting. Returned it. I've installed dozens of fans, and balanced them all. This one is beyond being able to balance with counter weights. I'm also a Mechanical engineer and PE. This is a poorly designed and fabricated fan.

I'm not sure if it was naive, but we decided to give the Kingsbury one more try, in case we got a lemon.  Of course, the second one didn't fare any better, but it did manage to waste a lot of our time.
Another interesting aspect is that despite the large diameter, the fan didn't seem to move much air.

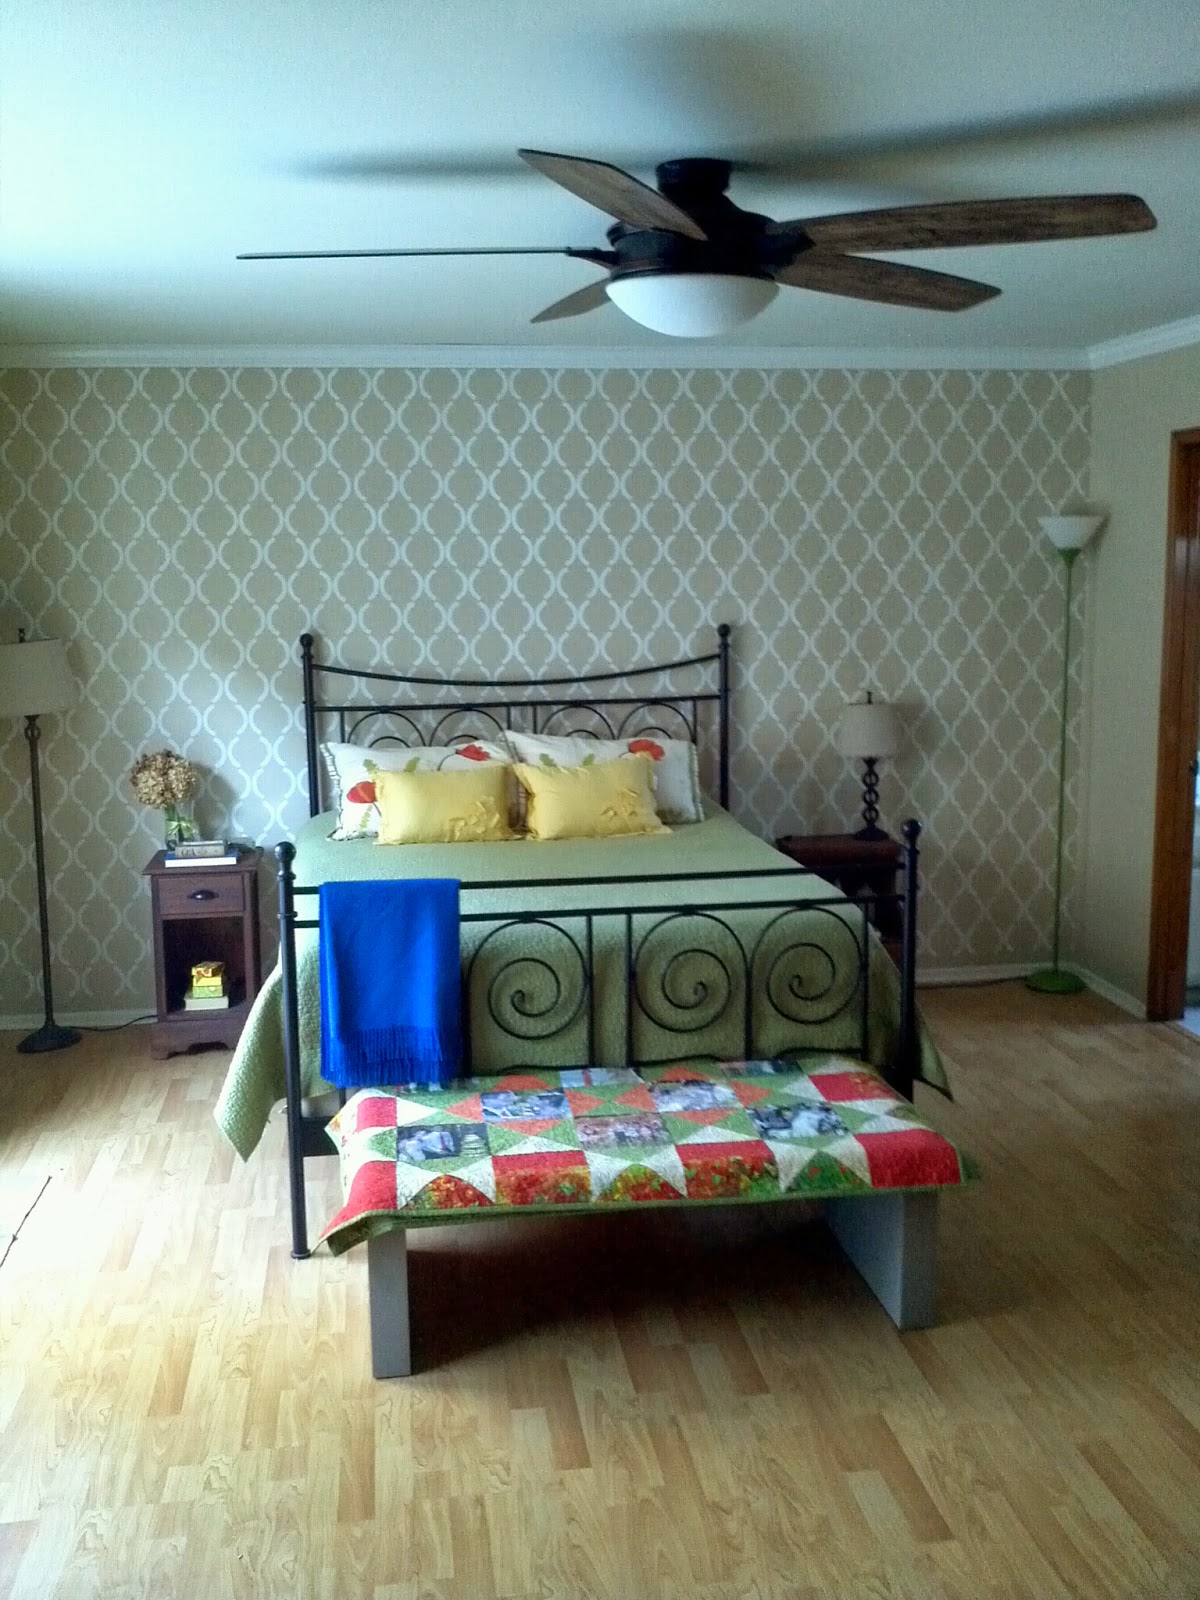
We went back to Lowe's and got our second choice fan, the Saratoga.  It was our second choice because it hung lower (18") than the other and uses candelabra bulbs.

Before mounting the new fan, I decided I would straighten out the receptacle, which I had mounted slightly crooked the first time.  That meant another fun trip into the attic.  With a little help from Chrissy, it was as straight as it was going to get.

I installed the new fan and held my breath when turning it on for the first time.  Even on the lowest speed, it produced a noticeable breeze.  I slowly increased the speed and reveled in the airflow (hurricane force when set to 6) and lack of wobbling/shaking.  This one is rock solid.  Hallelujah!


When straightening out the receptacle, I also tried to investigate the bathroom outlet failure.  After wedging myself into some tight, miserable corners, tracking wires, I remembered what had caused power outages in the past.  I yelled at Chrissy from the attic to try to reset the GFCI outlet in the other bathroom.  She did that and all was well.  Hallelujah again!

The last step was replacing the included incandescent bulbs with candelabra base LEDs, which use 1/5 the power of the incandescents and are significantly brighter (450 vs 338 lumens), despite both claiming to be 40W or equivalent.  FYI Lowe's has a much better candelabra base LED selection than Home Depot.

This new fan hangs a little low, so I'm considering shortening the rod, but I'm going to live with it as-is for a while and see how it goes.

Saturday, July 26, 2014

Miracle Product: Nasal Spray

 This is a little off topic, but I can't contain my enthusiasm for this miracle product:  lowly nasal spray.  On its own, the effectiveness of this product is miraculous, but so is the longevity.  The bottle you see here was purchased for me when I was a child because I refused to share with the rest of my family (note the faded "Andy's Only" marking).  I just polished off the last of it, and it was just as effective as the day I opened it, despite the fact that it "expired" in 1999.

Friday, July 25, 2014

Miracle Product: Knee Pads


I know what you're thinking, but this is completely innocent.  I wish I bought these before I went into the attic the first time, and not the 12th.  These babies make crawling around on rafters much more tolerable.  I opted for a set with a flat face, so I wouldn't slide off the rafters.

Friday, July 18, 2014

Miracle Product: Spray Texture


I was skeptical this product would work, but after multiple projects, it has proven to be miraculous.  When first applied, it looks questionable, but after drying and a coat of primer and paint, it blends in perfectly with the rest of the wall/ceiling.  There are some projects we couldn't do without it.

Thursday, July 10, 2014

Adding Airflow

I should probably start by telling you our "office" is the smallest room in our house, yet we tend to spend more waking hours there than in any other room.  Unfortunately, it can get a little stuffy in there, so we needed some airflow.  The obvious solution was to add a ceiling fan.  It also helped that the existing light was literally the cheapest fixture you can buy at Home Depot.

We visited both Lowe's and Home Depot in search of the perfect fan, and after roughly four hours of me hemming and hawing at each place, we finally bought one.

These are the tools the fan's instructions claim you'll need:

Here are all the tools I actually needed.  
Not Shown:  Ladder
I kicked off the project by voiding my warranty.  The fixture allows for a single bulb, and the one it comes with is a tiny "60W equivalent" compact fluorescent.  There's no way that was going to cut it, so we bought a 100W equivalent LED.  Of course, that bulb didn't fit, so I had to modify the mounting location of the socket.  This was a foolproof plan (note the sarcastic foreshadowing).
Before
After
The next (miserable) step was to replace the ceiling mount with something that could support the weight of a fan.  Here's the existing, plastic box:
From below
From above
 Here's the new, metal box:
From below
From above
 As luck would have it, the existing box was located directly below a 1x6 stringer that ties the joists together.  That made installing the new one particularly miserable.
Let me remind you again--only go in your attic first thing in the morning, when it's not 130 degrees in there.  That is my policy, but I wanted to get this thing done and I am going to be gone this weekend, so I decided to go for it in the evening.  It was just as sweaty and filthy as I expected.

After getting the new mount installed, the rest of the project was relatively easy.  Cramming all the wiring where it needed to go was unpleasant, but not more than expected.

Just as I was hitting the home stretch, I ran into a big problem.  That bulb mount I modified interfered with its mating surface.  Out came the Dremel.
Just a little off the top
After that, the light went right on and it was done.

And it works!

Even the fan!

If you're curious, the fan we got is the Midili from Home Depot.  It had the right combination of height, diameter, price, bulb type, and light distribution--all the things that made me hem and haw.

Sunday, July 6, 2014

Cutting Cabinets

Note from the Editor:  Sorry for the long gap in posts.  This project dragged on a little while, partially due to an interruption by a European vacation.  Hopefully the greatness of this project will make up for the delay.

Before
We have never been the biggest fans of our kitchen.  It has a decent layout, but it is definitely showing its age in most areas.  One of our biggest annoyances was the cabinets hanging off the ceiling between the kitchen and dining room.  It made it difficult to interact with people on the other side, and made the space feel much more closed in, so we decided to rip part of it out.  We might have removed more, but we wanted to retain the existing vent.  Fortunately, we had some expert free help.

The result is amazing.  The space feels much more open and it is actually safer, due to the removal of a head bumping hazard.  Best of all, the bang for buck factor is off the chart, given that the bang is huge and the buck was zero.
After

Here's the process:
Doors removed
Before view from behind
Queue the pry bar
End panel removed.  That piece bashed many heads over time.
Nail puller at work
Final trimming
Here's the new view from the kitchen
New view from behind
End panel re-installed, along with trim
The ceiling needed some work
A coat of primer
A little putty to even out the edges
Spray texture
Primer and final coat.  The finished product.