Sunday, December 30, 2012

Bare Bones


I have finally gotten the frame completely bare.  It wasn't easy, but with a little help, I got it.

The first step was removing the engine.  I came out easily enough, but it is a cumbersome little bugger.  It looks even more absurd outside the bike.

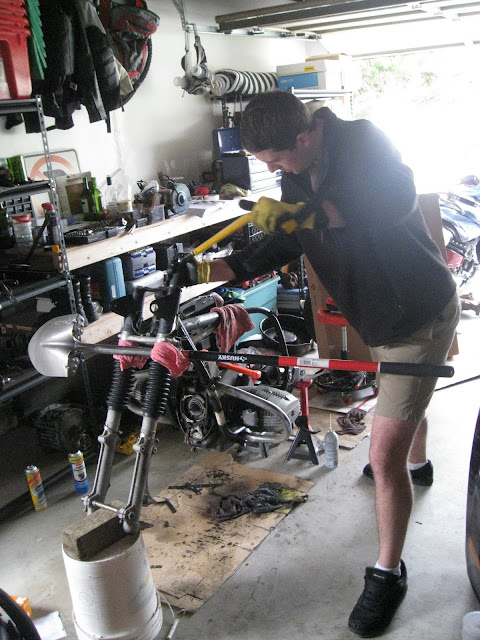
The final step was removing the fork.  Getting the two legs of the fork out was quite a process.  After removing the 36mm nut that I had previously loosened, they didn't want to slide out of the bottom clamping unit.  That resulted in the process you see below--basing a hatchet into the gap to expand the clamping piece.  This allowed the uprights to eventually slide out...reluctantly.

After that, I had to remove the triple tree, which was not easy either.  The bearing was very well seated, and after breaking the very tight nut free, it didn't want to release.  I proceeded to repeatedly bash it with the dead blow hammer until it came out.  That left me with the bare frame at the top of this page.

Now the real work can begin.

Saturday, December 29, 2012

New Wheels


I have purchased new wheels on ebay for the bike.  They are the OEM alloy "snowflake" wheels that were available on the bike.  Still deciding if I will make them black.

I got the front and rear separately, but they should match.  The rear came with a tire and axle.


As usual, I got smoking deals:
Front wheel new:  $1065,  Ebay:  $143
Rear wheel new:  $865,  Ebay:  $130

Saturday, December 22, 2012

Fork These Bolts

The fork bolts require a 36mm socket, which Amazon.com was happy to sell me.  I took the angle grinder to it to flatten the face since the bolts are pretty shallow.  It wasn't perfect, but it got the job done.

Shockingly, I wasn't able to loosen the bolts with my big breaker bar, so I had to put a pipe on the end to get some more leverage.  The shovel was used to prevent the fork from turning.  It also matches my short shorts.

I only loosened the bolts for now.  I will remove the fork as soon as I get the engine out, which will hopefully be this weekend.

Monday, December 17, 2012

Outlet Onslaught


We replaced the all the outlets and switches in the living room and dining room.  I also replaced the infernal dimmers in the two bedrooms that had them.
Going from beige to white makes quite a difference, although I would be happy to never replace any outlets ever again.

Sunday, December 16, 2012

That's Just Gate

The existing gate to our side yard had some issues with the latch mechanism.  You see, it was held on by a loose nail and a screw with a missing head.

I quickly and easily corrected the situation with a few toothpicks and a pair of corrosion resistant drywall screws.

Miracle Product: Smiley Sponge Holder

This is the only way to prevent your sponge from getting disgusting, and also the cutest.

Available here:
http://www.amazon.com/gp/product/B006GJZS1A/ref=oh_details_o00_s00_i02

Saturday, December 15, 2012

Dangling Bicycle

I have finally gotten around to hanging the mountain bike.  Chrissy can actually open her door when parking in the garage.

I probably should have done this a long time ago, especially considering it only took about five minutes and a hook I already had around.

Monday, December 3, 2012

Transmission & Center Stand Removal

The transmission and center stand pre-removal.
I finally got to the point where the transmission was ready to be removed.  I started by removing the speedometer cable and the clutch release mechanism.

Three bolts, one nut and a little help from Chrissy freed the transmission.  It was surprisingly light.

The clutch is going to be a chore to remove.  Apparently if not done right, it will fly into your face with substantial force.

I also removed the center stand, which was fairly straightforward.  Strangely, this is not what the stock unit looks like.  It would be interesting to know the story behind this.

Next comes the engine.

Saturday, December 1, 2012

Expunging the Exhause...and Rear Sub-Frame

It started out innocently enough.  I wanted to see if the finned exhaust nuts were going to come off without a fight.  I had been lubing them with penetrating oil for days and I now had the correct tool, so I figured everything was as ready as it was ever going to be.

I should mention that the various resources I have say you should be very careful when removing these things.  They are screwed directly onto the aluminum head and are notorious for seizing and taking the threads or worse off the head when removed.  My manuals actually advise removing them annually for inspection and a new coat of anti-seize.  I doubt mine have ever been removed.

I even went to the extra step of pouring boiling water over the nuts in a vain attempt to expand them ever so slightly.  It was hopeless.  I put my full body weight on the wrench and it didn't budge.  Not even Chrissy, who was helping, along with my brother, was able to loosen them.  It was instantly clear these things needed to be cut off.

In the process of trying to cut the nuts off, I bashed my leg into the rear sub-frame, so I determined it should be removed as well.  The result of that can be seen above.

Anyway, some quick Dremeling, hammering and chiseling snapped the first nut free.

In order to get at the left nut, we had to remove the "crash bar."  It's funny how removing two nuts can turn into so much more.
After removing the bar, we quickly checked to see if it could be unscrewed, but it was as firm as the other side, so the Dremel came out again.

With the nuts off, we unbolted the exhaust clamps and a few taps with the dead blow hammer released the exhaust assembly.

I am now ready to pull out the engine and transmission.