Sunday, December 30, 2012

Bare Bones


I have finally gotten the frame completely bare.  It wasn't easy, but with a little help, I got it.

The first step was removing the engine.  I came out easily enough, but it is a cumbersome little bugger.  It looks even more absurd outside the bike.

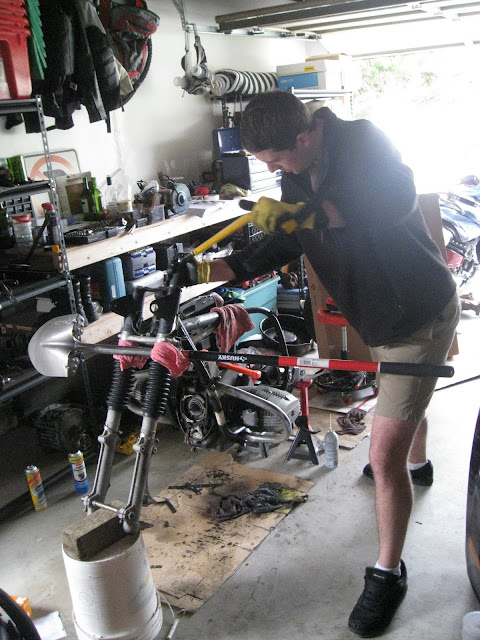
The final step was removing the fork.  Getting the two legs of the fork out was quite a process.  After removing the 36mm nut that I had previously loosened, they didn't want to slide out of the bottom clamping unit.  That resulted in the process you see below--basing a hatchet into the gap to expand the clamping piece.  This allowed the uprights to eventually slide out...reluctantly.

After that, I had to remove the triple tree, which was not easy either.  The bearing was very well seated, and after breaking the very tight nut free, it didn't want to release.  I proceeded to repeatedly bash it with the dead blow hammer until it came out.  That left me with the bare frame at the top of this page.

Now the real work can begin.

Saturday, December 29, 2012

New Wheels


I have purchased new wheels on ebay for the bike.  They are the OEM alloy "snowflake" wheels that were available on the bike.  Still deciding if I will make them black.

I got the front and rear separately, but they should match.  The rear came with a tire and axle.


As usual, I got smoking deals:
Front wheel new:  $1065,  Ebay:  $143
Rear wheel new:  $865,  Ebay:  $130

Saturday, December 22, 2012

Fork These Bolts

The fork bolts require a 36mm socket, which Amazon.com was happy to sell me.  I took the angle grinder to it to flatten the face since the bolts are pretty shallow.  It wasn't perfect, but it got the job done.

Shockingly, I wasn't able to loosen the bolts with my big breaker bar, so I had to put a pipe on the end to get some more leverage.  The shovel was used to prevent the fork from turning.  It also matches my short shorts.

I only loosened the bolts for now.  I will remove the fork as soon as I get the engine out, which will hopefully be this weekend.

Monday, December 17, 2012

Outlet Onslaught


We replaced the all the outlets and switches in the living room and dining room.  I also replaced the infernal dimmers in the two bedrooms that had them.
Going from beige to white makes quite a difference, although I would be happy to never replace any outlets ever again.

Sunday, December 16, 2012

That's Just Gate

The existing gate to our side yard had some issues with the latch mechanism.  You see, it was held on by a loose nail and a screw with a missing head.

I quickly and easily corrected the situation with a few toothpicks and a pair of corrosion resistant drywall screws.

Miracle Product: Smiley Sponge Holder

This is the only way to prevent your sponge from getting disgusting, and also the cutest.

Available here:
http://www.amazon.com/gp/product/B006GJZS1A/ref=oh_details_o00_s00_i02

Saturday, December 15, 2012

Dangling Bicycle

I have finally gotten around to hanging the mountain bike.  Chrissy can actually open her door when parking in the garage.

I probably should have done this a long time ago, especially considering it only took about five minutes and a hook I already had around.

Monday, December 3, 2012

Transmission & Center Stand Removal

The transmission and center stand pre-removal.
I finally got to the point where the transmission was ready to be removed.  I started by removing the speedometer cable and the clutch release mechanism.

Three bolts, one nut and a little help from Chrissy freed the transmission.  It was surprisingly light.

The clutch is going to be a chore to remove.  Apparently if not done right, it will fly into your face with substantial force.

I also removed the center stand, which was fairly straightforward.  Strangely, this is not what the stock unit looks like.  It would be interesting to know the story behind this.

Next comes the engine.

Saturday, December 1, 2012

Expunging the Exhause...and Rear Sub-Frame

It started out innocently enough.  I wanted to see if the finned exhaust nuts were going to come off without a fight.  I had been lubing them with penetrating oil for days and I now had the correct tool, so I figured everything was as ready as it was ever going to be.

I should mention that the various resources I have say you should be very careful when removing these things.  They are screwed directly onto the aluminum head and are notorious for seizing and taking the threads or worse off the head when removed.  My manuals actually advise removing them annually for inspection and a new coat of anti-seize.  I doubt mine have ever been removed.

I even went to the extra step of pouring boiling water over the nuts in a vain attempt to expand them ever so slightly.  It was hopeless.  I put my full body weight on the wrench and it didn't budge.  Not even Chrissy, who was helping, along with my brother, was able to loosen them.  It was instantly clear these things needed to be cut off.

In the process of trying to cut the nuts off, I bashed my leg into the rear sub-frame, so I determined it should be removed as well.  The result of that can be seen above.

Anyway, some quick Dremeling, hammering and chiseling snapped the first nut free.

In order to get at the left nut, we had to remove the "crash bar."  It's funny how removing two nuts can turn into so much more.
After removing the bar, we quickly checked to see if it could be unscrewed, but it was as firm as the other side, so the Dremel came out again.

With the nuts off, we unbolted the exhaust clamps and a few taps with the dead blow hammer released the exhaust assembly.

I am now ready to pull out the engine and transmission.

Wednesday, November 28, 2012

Swingarm Success

As you can see, the swingarm is off the bike.  It was a bit of a hassle because it required a socket to be machined down in order to remove the bolts.  I have to thank a friend who helped me out with that.  Saved me a bundle of money and/or time.  Thanks again.
Machined 27mm socket.
The other hassle was removing the four bolts that hold the drive-shaft to the transmission output.  They are pretty inaccessible, and the rubber boot is really in the way.

No more swingarm.

Parts Packages

My parts have arrived.  They are as thrashed and rusty as I could have hoped for.  I definitely won't feel guilty about hacking them to pieces.

Saturday, November 24, 2012

Black Friday Bargain

Gustavo (that's our car's name) can go no bigger.
Even though I don't really believe in all the madness, we caved to the pressure of Black Friday and bought a TV for the living room.  Technically, we got it Thursday, so we are better than most Black Friday shoppers.

I did extensive research and decided to get what many sources were calling one of the best deals this year, a 60" LED backlit smart TV.  My dad and I trekked to Walmart and waited in line to score this giant Vizio.

We got it home, just barely (see above), and it's working great.  The only problem is we can't find our rabbit ears, so it looks like we're going to miss Sunday Morning tomorrow on CBS.  I still have no intention of paying for cable or satellite.

It is sitting on our old dining table right now.  Hopefully we will come up with a permanent place for it soon.

The best part is, I was able to hook it up to my speakers using a fiber optic cable and the sound is amazing.
The worst part is I now have something in my house worth stealing, so I'm going to be paranoid about locking up.  I'm going to have to remember to start closing the back door when we leave too.

Tuesday, November 20, 2012

Inspiration 3


I like the seat setup on this thing.
http://www.pipeburn.com/home/2012/9/4/classified-motos-92-honda-cb250-mohawk-250.html


This exhaust is very similar to what I'm thinking of.
http://www.returnofthecaferacers.com/2012/10/suzuki-gs450-cafe-racer.html

16 cell EVO2 battery photo
This is the battery I'm thinking of using.  It is pretty spendy, but I think it will fit perfectly in the air box and help create a super clean look.  I can buy it on Amazon too!
http://www.ballisticparts.com/products/batteries/16cell.php


Cool BMW.
http://www.pipeburn.com/home/2012/10/27/scott-halbleibs-bmw-k100rt-number-3.html

Moto Guzzi Le Mans
Cool seat and tail thingy.
http://www.bikeexif.com/revival-cycles-moto-guzzi

Custom BMW motorcycle
This is a very clean BMW.  I like the seat and rear fender.  The front fender is also pretty clean.  Apparently, this thing has been lowered a couple inches.
http://www.bikeexif.com/bmw-motorcycle


I saw one of these Triumphs on the street and they had removed the hideous fender and taillights.  It looked pretty sweet.
http://www.triumphmotorcycles.com/motorcycles/range/classics/thruxton/2013/Thruxton

Sunday, November 18, 2012

The Strip Show Redux

Starting to look pretty bare.
It was time to tackle the intimidating electricals, not to mention the hydraulics.

Before I did that, I started with something easy:  the final drive unit.
It wasn't too bad.  I just had to disconnect the rear brake, remove the brake shoes, take off the shock then remove four nuts.  A couple smacks with the trusty dead blow hammer loosened it up and the job was done.


Now it was time for the electricals.  I actually made video of me removing them, but I will spare you that fun.  I like to save absurd videos for the house-related posts.
There were a couple tricky connectors and things, but it wasn't too bad.  The worst part is that I unplugged everything inside the headlight when I didn't need to.  It may never go back together.  Thank god I have a full-color wiring diagram.

The instrument panel came off first.

Then the headlight.
This is before I tore into it.
 And everything with it.
The infamous wiring harness.  I only know what 1/4 of the wires are for.

Hand grips and controls were next.

And the handlebars themselves.

Here is my inspiration for the entire project:  the handlebar mounts.  They are amazing - raw aluminum in the perfect shape.
Aerodynamic perfection.

There was also the master cylinder and the front caliper.


I also have some part purchases to report.  I ordered the exhaust nut wrench along with a bunch of random maintenance parts like gaskets and oil filters.  I also got the rebuild kit for my carbs.  All of it came from http://www.northwoodsairheads.com/

I also made some ebay purchases.  All from one seller, I got header/exhaust pipes, a rear subframe, and a timing chain cover to basically replace the one I broke the bolt in.  These are all identical parts to what I have, but they are cheap and allow me to keep the original parts in-tact in the off chance I want to return to stock someday.

I also picked up a new front fender five minutes ago.

Before all that, I got a new air box.

Here's some fun numbers.  The price to get these parts new and what I payed.  All prices not including shipping.
Air box:  $160 new; $30 ebay
Rear frame:  $592.94 new; $32 ebay
Exhaust:  $478.58 new; $65 ebay
Timing cover:  $356.72 new; $36 ebay
Front fender:  $188.66 new; $10 ebay

I have reached an interesting milestone - I have now spent more on parts and miscellaneous stuff for the motorcycle than I paid for the motorcycle itself.  Does this project make sense any more?  I don't think it ever did.


Thursday, November 15, 2012

Fluid Flush

It was time to drain the fluids in preparation for the final stages of disassembly. Above is the engine oil draining.

I also pulled off the oil pan.  It was a little stubborn,  but a couple hits with the new dead blow hammer and a pry from a screwdriver freed it up.  I am definitely going to need a new gasket.

The other half of the gasket and the inside of the engine.

Next came the transmission oil.

Then the drive-shaft oil and the the final drive oil, which are separate.  The drive-shaft drain plug is hiding right behind the rod for the rear brake.

This thing is now bone dry and ready to come apart in a big way.  That, however, will have to wait until after a trip to the machine shop for one very important thing.  Find out what that is next time.

Wednesday, November 14, 2012

Filthy Filter

This is what the furnace filter looked like when we moved in.  I'm pretty sure it was time for a replacement.

This is what the new one looks like.  I can barely tell the difference.

It's kind of shocking how negligent some people can be, even with something as important as their home, and in this case, air quality.