Wednesday, July 31, 2013

What's Better than Street Finds?

Not the actual dumpster I rummaged through.
Dumpster finds!!!
While causing trouble in my brother's alley over the weekend he discovered a shelf in his apartment complex's dumpster and jokingly asked if I wanted it.  Noticing that it perfectly matches my desk, I said, "Heck yeah!"  And now it's mine.

I also pulled a shoe rack out of said dumpster, and it has improved the organization of my footwear immensely.

Monday, July 29, 2013

That Escalated Quickly

I decided it was time to open up the wall and really investigate the aftermath of the leaking pipe.  I figure drywall is cheap and since it's in the garage, there won't be a huge rush to get everything back together and it doesn't have to be perfect.

I kept expanding the hole and kept finding dampness and mold.  Not good.

Eventually I had this:
I never liked finished garages anyway.
Now I need to spend some quality time with some bleach.

Sunday, July 28, 2013

Latest from the Living Room


We have put a few more finishing touches on the living room.  It is very nearly done.  The first thing, which you can see above is curtains and rods.  Also below on the other window.


You can also see the cool vintage car adds (~1910) we hung next to the window.  Chrissy saved them from being scrap lumber several years ago and they look great in the living room.

We also got a new entry mirror, complete with shelf and hooks, not to mention the new light fixture (top left), which replaces an awful gold unit that we were too ashamed of to even put bulbs in.  It is really nice having a decent amount of light in the living room after sunset.

Saturday, July 27, 2013

Busting Ass in our Beautiful Back Yard


Our back yard was in pretty sorry shape when we moved in, and we didn't give it much love for quite a while.  That is no longer the case.  In the photos above and below you can see the mostly barren, weed infested yard, complete with splotchy grass.


After much backbreaking labor, you can see our beautiful new yard below.
Herbs on the left have been planted since the photo was taken.


Here are some details.
A selection of eight herbs.
Arabian jasmine
Apple tree with three varieties of apples and "standard" jasmine behind.
Some other jasmine variety.
Fruit salad tree with five stone fruits:  white peach, yellow peach, nectarine, apricot, and plum.
Hacked giant bird of paradise.
Here is that tree before Chrissy chopped down the ugly stalk (while wearing a bikini).
Two varieties of gardenia, and our existing bougainvillea.
Avocado tree, composter and stepping stones.
Blueberries!
Citrus tree with six (!!!) varieties of citrus.  We just enjoyed our first limes.
Existing jujube tree. 
Climbing rose.  Hopefully will have something to climb on soon.
Honeysuckle, which is growing like crazy.
As you can probably imagine, this took a ton of work.  Luckily we had some help from my brother and buddy, Ryan.

We started by removing the weeds.  That involved some aggressive weed-whacking and then one more step to try to keep them from coming back:
Chrissy didn't want to use chemicals, so we decided to kill them with FIRE.  The video above was a quick test burn right after we got the torch.

We also put down weed control fabric (which seems somewhat useless so far) and two truckloads of free Torrance mulch.
I did this on my lunch break.  My sweaty lunch break.


It was a ton of work, but the final result is worth it.  We hope to enjoy it for years to come.

Friday, July 26, 2013

I Love Lamp


This is a lamp with a long back-story.  My brother snagged it a long time ago when it was gold and tacky because he thought it had potential to be refurbished.  It was around for several years and he never did anything with it, so eventually I brought it into Chrissy and my apartment and finally rejuvenated it, with a metal flake blue paint job, new wiring, new shade (which wasn't ideal) and a spherical chrome finial.

Chrissy rightly decided the metallic blue didn't really fit into our new house, so it needed to be updated again. The beautiful result can be seen below.
Some cream colored paint and a new shade class things up and it goes perfectly with out new living room.

Friday, July 19, 2013

Garage Cabinet

The cabinet in the garage is finally mounted.  Looks great.

 Four screws seem to be enough.

Here's a preview of what it will look like when the sink is installed, but some plumbing work is needed before that can happen.


Thursday, July 18, 2013

Back to Life

The Yamaha has finally been put back together.
I had all the parts on hand, but didn't have the time until the 4th of July weekend to button everything back up.
The most miserable thing I had to do was also the first thing--remove the bits of old gasket from the alternator cover and crank case.  I spent about an hour scraping things with a razor blade on Friday.  That is all I could do before my back started to ache, so I stopped there and worked on other projects.
I got back to it on Sunday and continued scraping.  It got so tight I had to snap a razor blade in half to reach some areas.
I also started charging the battery using the charger I inherited from my grandpa, which has only been run over by one car.

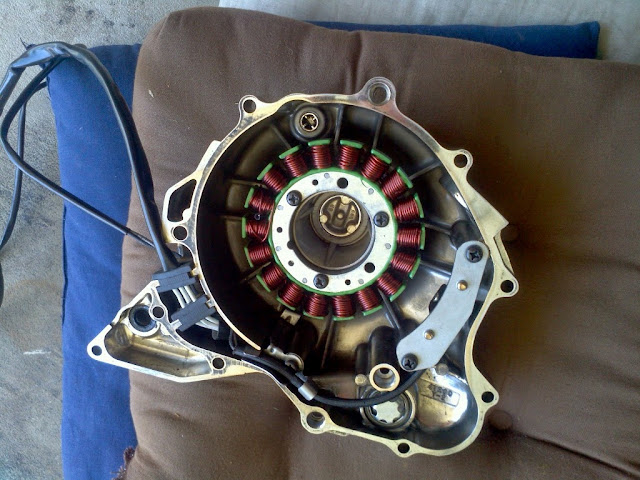
After getting the old gasket cleaned off to my satisfaction, I started bolting things back together.  First was installing the new stator in the cover.

I installed the new gasket and with just a little struggle, bolted the cover back on.  I even got to use my new torque wrench to tighten it up.  Running the wiring wasn't as bad as getting it out.  I'm not too sure why, but it went pretty smoothly.
After that, everything else bolted up pretty easily, with only a little struggle on the kickstand and it's position sensor.
After putting everything together, I did the best I could to run through all the systems in my head to make sure the bike was ready to ride.  I did adjust the clutch cable a little bit because it was dragging slightly, but I thought it would probably loosen up when I the engine was running and it got some oil circulated.
It fired up relatively easily, considering it hasn't run in nearly a year.  As I predicted, the clutch worked perfectly, as did the rest of the bike.  Unfortunately, I am not certain the repair is working.  We will see how the electrical system performs over time, but I may well need a new battery, since mine is a few years old and has been sitting with a low charge for a while.  We'll see what happens.
Motorcycles wouldn't be so exciting if they were totally predicable.

Wednesday, July 17, 2013

Garage Drywall


The last time you saw the corner of the garage, we had pulled out the cabinet and revealed a hole in the drywall.
It was time to fill that hole, so we started by making it bigger.

I wanted to have the seam be on a stud, so we had to expand the hole to the next stud.
Garages clearly don't need insulation.
After cutting the filler piece, we only had to adjust it 47 times to get the perfect fit.

Since this is the garage, it doesn't have to be perfect.  Tape and mud is a little more effort than I want to put in, so a little spackle smoothed things out enough.

A coat of primer on the patch and the area where the cabinet was cleaned everything up quite a bit.

Now we're ready to install the smaller cabinet and sink.

Sunday, July 14, 2013

Our First Plumbing Disaster

It was bound to happen, although, I wish it would have happened a little later; we had our first plumbing disaster.  The image above is just a glimpse, but I should start at the beginning.

It all started when Chrissy noticed the ceiling in the guest bath was bubbling a little.  We assumed it was due to our wonderful guests neglecting to use the vent fan when showering, thus not a big deal and nothing to be done.

A couple days later I went into the garage and discovered a puddle.  There was obviously a bigger problem somewhere.


I initially assumed it was coming from the shower valve on the other side of the wall, so I removed the handle and cut the hole you see in the lead photo (ironically I had just patched a different drywall hole--post coming soon).  It was clear the water was coming from higher up, so I unscrewed the shower head and didn't find anything.

It had to be in the attic, so I crawled in.  At first I didn't see anything, but I moved some insulation and found a puddle.

I couldn't find the source of the leak, but I eventually heard it.  I finally moved one more piece of insulation and found a pinhole leak in the copper pipe, letting out a steady mist.  I don't know how that happens, but apparently it does.  If you look really hard, you can see the stream in the pictures below.


Now I had to figure out how to fix it, ideally without calling a plumber or burning myself with solder.  I remembered seeing a repair after a pipe burst at Greenfield Professional Building that involved a big metal clamp, so I was off to Home Depot.
Despite the employee not knowing what he was talking about I found the clamp I needed and headed home.
The installation was easy, aside from the bolts being too long to allow me to use a ratchet.
The final step was to somehow dry the mess and hopefully prevent horrible, horrible mold, which seems to have already started forming (gulp).  I figured airflow was key, so I grabbed our fan.

So far, the fan seems very effective, as does the clamp.  Hopefully it holds for a long time.

I'm a bit unsure what to do about the water damage.  I'm thinking we should let it dry and go from there.