 |
| Before |
The basic layout of most closets is flawed, and this one was particularly bad. The single rod and shelf layout creates dead space above the shelf and below the clothes. We tried to utilize these spaces with flimsy little shoe racks, but it wasn't cutting it. The corners also create a lot of dead space in the hanging area in U shaped closets like this one.
Our closet was particularly annoying because the rod was mounted further from the wall than necessary and the one shelf was absurdly deep. All of which resulted in the closet feeling very cramped when it is actually a pretty big space.
My first step was excessive planning. I figured there were going to be lots of people helping, so a clear plan would be beneficial. The main goals were to make a dresser fit and increase usable space. To do that, the top shelf was moved upward along with much of the hanging rod. We converted to two rows of rods in a couple places and added floor to ceiling shelves in the corners.
Here's my schematics. PowerPoint engineering at its finest.
The first step in the actual work was clearing out all our stuff. It's amazing how much we were able to cram in there, not to mention how many generations of dust bunnies were hiding.
Next came the best part, demolition. Check out that PPE (personal protective equipment).
After my dad patched the holes and I did the world's worst texturing job, it was time for some primer.
After primer came two coats of our signature color, bitch-ass beige. Look how big that closet is; we considered turning it into a fifth bedroom, but didn't want to deal with adding a window. The dimensions are about 92" x 79".
 |
| This is after one coat. |
Once all the shelves were cut, I clamped them in the Workmate and smoothed them off with the belt sander.
After a lot of work, it was finally time to start driving some screws. We started by marking every stud and snapping a chalk line along each one. This was incredibly helpful throughout the project.
Here's a custom touch that was fun. To prevent one of the rods from punching though the wall again, I added a flush metal plate to the back of one of the mounting boards.
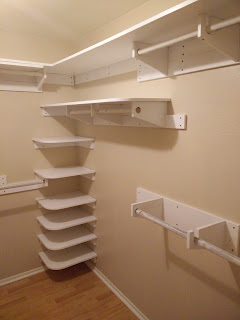
Here's what it looked like with all the shelf supports in, along with some of the rods.
Chrissy was very excited to restock.
This is what it looks like with everything back in place. It is a little hard to tell, but there is lots of room to spare now, even with the addition of a dresser to the space.
 |
| After |
Here you can see our new stacking "hampers" and the steaming station.
After clearing that junk out, we moved our La-Z-Boy into that corner. We think it could come in very handy for midnight baby feedings. We might get something a little more stylish to go there in the future.
Finally, I need to thank everyone who helped with this project. I couldn't have done it alone.
Here's one final before and after:
 |
| Before |
 |
| After |


It still looks like shit. You should organize the clothes by color and also invest in matching hangers. I recommend black Huggable Hangers.
ReplyDelete- Bryson
Just kidding. It looks great. It's pragmatic. But seriously.. the matching hangers.
Delete- Wong, Kyle, Autri, Zoe